Building iOS Apps on Azure Pipelines
Traditionally, setting up a continuous integration system for iOS development is not always trivial. Since building can only happen on macOS, this requires a dedicated machine or alternatively, a machine you can rent (in the cloud). With all the hosted CI these days offering macOS support, such a task becomes less challenging.
In this blog post, I summarize the necessary steps to utilize Azure Pipelines, part of Azure DevOps (formerly known as Visual Studio Team Services) to let you run the compilation process of your iOS apps. This is fantastic to maintain the development quality, as the automatic build can be hooked into the code review process, such as the GitHub pull request workflow. That allows you (and your team) to prevent bad commit to enter the repository, thereby fulfilling the practice of continous integration.
To follow along, check the repository github.com/ariya/hello-ios. This is a simple iOS app written in Swift (the principle applies to Objective C apps, too). After you clone the source repository, first you can verify it by building it with Xcode and perhaps even running it in the simulator.
To automatically have this project built on Azure Pipelines, what we need is the proper YAML file to describe the configuration. In the repository, you can find this as azure-pipelines.yml. First, we have to ensure that the process will run only on macOS, this is defined with the first two lines:
pool:
  vmImage: 'macOS 10.13'
Since this is a hosted agent maintained by Microsoft/Azure DevOps, we do not need to worry about its setup, updates, maintenance, etc. The build agent is already equipped with Xcode, iOS SDK, as well as other bits and pieces necessary to handle an Xcode project.
Next step is to actually invoke xcodebuild command line tool. Fortunately, there is this Xcode task from Azure Pipelines that simplifies it. The bare minimum necessary to build the project/workspace will be something like:
- task: Xcode@5
  displayName: 'Build the app using Xcode'
  inputs:
    actions: 'build'
    sdk: 'iphoneos'
    scheme: 'HelloiOS'
    configuration: 'Debug'
    xcWorkspacePath: '**/*.xcodeproj/project.xcworkspace'
    useXcpretty: 'false'
All the arguments are pretty self-explanatory. In case you need more detailed information, refer to its excellent documentation.
Since this is a very small project, the above build step is completed in just 22 seconds. That is not bad for such a hassle-free setup!
Oh, if you project has some third-party dependencies managed using CocoaPods, and for some reasons you prefer not to check-in and commit that third-party code into the repository, then pod install need to be executed before the above task. Again, we could use the simple CocoaPods task built into Azure Pipelines:
- task: CocoaPods@0
  displayName: 'Install dependencies'
  inputs:
Now, the above combination is sufficient to let you build the app and also, if necessary, run its test suite. But often times, we also want to package the app and store the archive as the build artifact This is beneficial since anyone can grab the archive for any potential troubleshooting purposes in the future. To do this, we shall modify the invocation of the Xcode task to be something like (and while we are it, we also invoke other useful Xcode actions: clean and analyze)
- task: Xcode@5
  displayName: 'Build the app using Xcode'
  inputs:
    actions: 'clean build analyze archive'
    sdk: 'iphoneos'
    scheme: 'HelloiOS'
    configuration: 'Debug'
    xcWorkspacePath: '**/*.xcodeproj/project.xcworkspace'
    useXcpretty: 'false'
    args: '-archivePath $(agent.buildDirectory)/HelloiOS'
Note the use -archivePath to specify the output of the Xcode archive (which is going to be a directory). To have Azure Pipelines store this directory as part of the build artifact, two more steps are necessary:
- task: ArchiveFiles@2
  displayName: 'Package .xcarchive into a zip file'
  inputs:
    rootFolderOrFile: '$(agent.buildDirectory)/HelloiOS.xcarchive/'
    archiveFile: '$(build.artifactStagingDirectory)/HelloiOS.xcarchive.zip'

- task: PublishBuildArtifacts@1
  inputs:
    pathToPublish: '$(build.artifactStagingDirectory)/HelloiOS.xcarchive.zip'
    artifactName: 'xcarchive-files'
    artifactType: 'container'
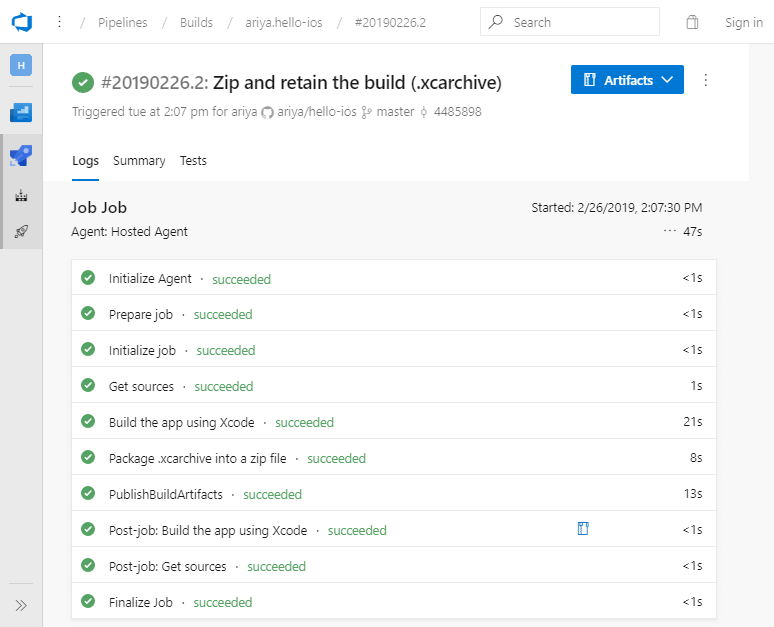
Now, whenever the build is completed, we can always press the blue Artifacts button (top right corner) to grab the ZIP file contained the .xcarchive directory. As a bonus, we can also use xcodebuild’s archive exporter feature to turn this into an .ipa file, provided that we have the provisioning profile. That will be quite handy at some point.
Happy building!