Flick List with its Momentum Scrolling and Deceleration
The launch of Apple iPhone few years ago popularizes the use of flick list, a touch-friendly list interface with a bit of physics when hitting the edge and scrolling. This effect is often known as momentum scrolling (although personally I prefer the more romantic term, kinetic scrolling).
Ages ago I was involved with the C++ and Qt side of this in the form of Flick Charm (a magic spell to flickify any QAbstractScrollArea) and Flickable (base class to enable flicking on any widget). The code is structured around a simple state-machine, making it easy to understand and debug. Note: you may collapse Pressed and Stop states, they were two separate ones due to a workaround which is not needed anymore.

For the mobile web, there have been attempts to reimplement this flick list concept using pure JavaScript. Out there, you can find projects like TouchScroll, iScroll, Scrollability, Zynga Scroller, and many others. The idea is rather straightforward: handle touch events yourself so that you can simulate the scrolling behavior that suits your need. This way, the lack of position:fixed and/or overflow:scroll is nicely compensated.
Aller guten Dinge sind drei. Third time is a charm. My third attempt to have a simplified way enabling kinetic scrolling was far from finished. I already put the initial usable version (also ported to JavaScript) more than a year ago. Rather than waiting for perfection, I decide to dissect one particular part which is my favorite: the deceleration. Also, now it comes both in C++/Qt and JavaScript flavors. To keep this blog post as short as possible, I’d focus only on the deceleration itself. Topics around rubberband/bouncing effect, snapping, direct style setting vs CSS3 animation, etc will be reserved for any future discussion.
When I started to work on Flick Charm 3 years ago, I did not pay attention carefully to the way the scrolling works on iPhone. I was just assuming that the deceleration is based on Newton’s law of motion, i.e. a moving body receiving a friction which is forced to stop after a while. After a while, I realized that this is actually not how iPhone (and later iOS devices such as iPad) does it. Using a camera and capturing few dozens scrolling movement of various iOS applications, it came to me that all the scrolling will stop after the same amount of time, regardless the size of the list or the speed of the flick. How fast you flick (which determines the initial velocity of the scrolling) only determines where the list would stop and not when.
(If you are a professional working with high-speed photography, I invite you to do the above camera analysis. By using a suitable high-speed camera, I’m fairly confident that the precise movement of every pixel can be accounted for, and thus would help to verify my postulate above. For example, this could be a nice episode of Mythbusters!)
This observation led me to believe that the momentum scrolling is a sort of exponential decay. It is characterized by the speed of the decay. There are two different ways to express it: half-life (remember radioactive decay?) or time constant. For the latter, it is very much related to the step response of a first order system. In other words, the deceleration system is just an overdamped spring-mass system. Turns out, everything is still based on physics.
Note: Since two-dimension scrolling (x and y) is just a linear combination of two independent flick movements, it’s easier to implement the deceleration for each axis and then combine the result. For the rest of the blog post, this would be the assumption.
A clever trick to set the scrolling position based on the exponential decay is by using the fact that it slows down at a rate proportional to its value. This simplifies the math of the deceleration a lot, there is no need for complicated way to keep track of the time, velocity, tweening using Bézier curve, etc.
The code to implement this above decay is ridiculously simple, here is one way to do it:
amplitude = initialVelocity * scaleFactor;
step = ;

ticker = setInterval(function() {
    var delta = amplitude / timeConstant;
    position += delta;
    amplitude -= delta;
    step += 1;
    if (step > 6 * timeConstant) {
        clearInterval(ticker);
    }
}, updateInterval);
We choose to stop after scrolling for about 6x the time constant because at that point the new position will be within 0.25% of the target position. Another variant would be to stop when the scrolling movement enters the subpixel area (i.e. it is going really slow). The time unit can be arbitrary, but be careful to normalize it with the timer resolution of setInterval. Using the above code fragment, the position as a function of time is depicted in the following graph (each tick in the horizontal axis represents the time constant):

In fact, this is how the deceleration is implemented in Apple’s own PastryKit library (and now part of iAd). It reduces the scrolling speed by a factor of 0.95 for each animation tick (16.7 msec, targeting 60 fps). This corresponds to a time constant of 325 msec. If you are a math geek, then obviously you realize that the exponential nature of the scroll velocity will yield the exponential decay in the position. With a little bit of scriblling, eventually you find out that 325 is -16.7 / ln(0.95).
The time constant itself is the solution to the two values of decelerationRate in UIScrollView: normal vs fast. Various scrollable lists in typical iOS applications are using a normal deceleration rate. However, UIWebView seems to be on the fast side. This is evidenced when you use Safari to browse a long web page as flicking the web page scrolls much less than as if you flick on e.g. the contact list. Usually, Safari completes the scrolling in less than half a second.
If you choose to have a slightly slower method, at the added benefit of being more robust against slower frame rate (see Android problem below), use the solution of the differential equation of the exponential decay:
![]()
amplitude = initialVelocity * scaleFactor;
targetPosition = position + amplitude;
timestamp = Date.now();

ticker = setInterval(function() {
    var elapsed = Date.now() - timestamp;
    position = targetPosition - amplitude * Math.exp(-elapsed / timeConstant);
    if (elapsed > 6 * timeConstant) {
        clearInterval(ticker);
    }
}, updateInterval);
(If you want to have snap-to-grid feature, there is a subtle hint in the above code fragment!)
Should you think that computing the exponent for every frame is too expensive, you can cache the values. If the time constant is 325 msec and the scrolling stops completely after ~2 seconds, with 60 fps animation you will only need an array with 120 values. Memoize this array based on the time constant and now you avoid calling Math.exp all the time. This comes at an expense, you won’t be able to adjust for degraded actual frame rate.
The online demo for mobile WebKit is available at ariya.github.com/js/kinetic (actually, it’s been there for a year!). The source code is easier to get from my code example repository (or the mirror), look at javascript/kinetic for the web and widget/kineticmodel for native (C++ and Qt). For the latter, there is a simple example widget/namelist. In both cases, the code should be generic enough and can be reused for other types of scrolling.
For the content of the web version, I pick the first four letters from Robert Walton in the famous Frankenstein novel. When viewed in portrait, the usual smartphone will render the text element as long as 4000 pixels, thus making it a nice stress test for the scroller.
For a good measure, I also included a primitive frame counter, measuring the amount of the handler for the timer is invoked averaged for the last few seconds. It’s likely not terribly accurate (depending on the platform, some rendering-related part may run asynchronously on a different thread), but it’s good to have a quantitative index of the performance. In addition, the scroll indicator on the left side is intentional, this is to avoid easy confusion with a native scroll bar (which would not appear if everything works properly). And even if you are going offline right after, the demo should still work since it leverages application cache.
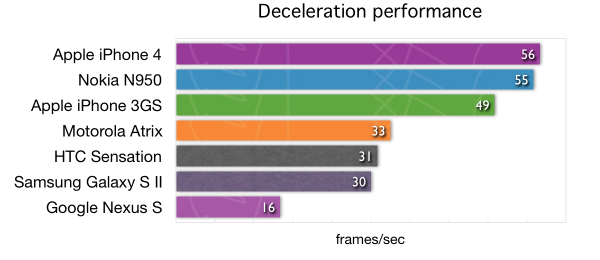
On typical iOS devices, such as iPhone and iPad, scrolling very close to 60 fps is easily within reach. Nokia N9 or N950, due to its excellent browser, can get the same performance without any problem. As for Android phones, partially due to the lack of GPU compositing (a topic for another blog post), it does really depend on the hardware power, e.g. Nexus S won’t likely go beyond 25 fps. For your pleasure, enjoy the complete performance chart below (many thanks to my linguist friend Donald Carr and also Ronny and Espen for providing the results for Galaxy S II). Note that since rendering is always related to the number of pixels on the screen, be cautious when doing the comparison.
Obviously, if you really want the frame rate of 60 fps or more, adjust the timer update interval to be less than 16.7 msec. That way, there would be more processor time allocated for the computation part and thus the intended fluid scrolling is easier to achieve. For example, setting the update interval to 0 will push the speed to over 75 fps on those iOS devices.
What about CSS3 animation? It’s fantastic to use this new animation system because (depending on the system) it can be composited (and thus, easily GPU accelerated). The performance is expected to be better because instead of calculating the position for every frame, we let the rendering engine (in its native code) to deal with it. Instead of using the built-in animation timing function (based on cubic Bézier curve), custom deceleration can be perfectly achieved using keyframes. This trick is used e.g. in Scrollability, read the blog post from Joe Hewitt for more detailed info.
When I find some spare time, I’d like to discuss some follow-ups such as edge bouncing, snapping (which should be easy already), optimized keyframes generation, and other related topics. Till then, enjoy the momentum!