JavaScript Kinetic Scrolling: Part 2
In the second part of this series of JavaScript kinetic scrolling example, the inertial effect is implemented. This is done by tracking the movement while the user is still dragging the view and then automatically scroll the view until it stops at some point.
The first part already covered the basic drag-and-scroll technique (if you have not read it yet, please do so because the concept will be reused here). Before we add the kinetic effect, let us see first what happens to the scroll offset of a list view as the user taps, drags, and releases his finger.
The shaded area in the above diagram is when the user still manually controls the list, he scrolls up and then down and then up again. Right when this user finally releases his finger, the list starts to enter the automatic scrolling mode. During this mode, the list starts moving at a certain speed but then it slows down and then eventually it comes to a halt. To carry out the automatic scrolling, it is important to figure out the initial velocity right at that release moment. This is done by tracking the finger position and computes the velocity, this happens between the tap and release.
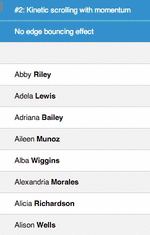
If this kinetic scrolling is implemented properly, what we would get is something depicted in the following animation (GIF, forgive the quality). Should you want to play with the live demo, go to ariya.github.io/kinetic/2 with your favorite modern smartphone. Pay attention to the smooth scrolling as you flick the list. Note that it does not have edge bouncing feature yet, we will cover this in some future episode.
How to track the velocity while the user is still dragging and scrolling the list? A simple approach, among a billion possibilities, is to use a periodic timer. When the timer fires, retrieve the current position and use it to compute the velocity. Empirically, tracking the position 10 times per second (a timer interval of 100 ms) proves to be sufficient.
This tracking activity shall start as soon as the user initiates the tap, hence we modify our tap() function implementation to look like the following. The key here is that the function track() which will be invoked repeatedly as long as we still want to track the velocity.
function tap(e) {
    pressed = true;
    reference = ypos(e);

    velocity = amplitude = ;
    frame = offset;
    timestamp = Date.now();
    clearInterval(ticker);
    ticker = setInterval(track, 100);

    e.preventDefault();
    e.stopPropagation();
    return false;
}
The code for track() is quite short. The idea is to compare the current position and time to the previous recorded position and time, frame and timestamp, respectively. From this delta, the instantaneous velocity v is easily obtained. The last line acts as a simple moving average filter, this protects us from any wild variation, either from the user’s own erratic movement or from other input noise.
function track() {
    var now, elapsed, delta, v;

    now = Date.now();
    elapsed = now - timestamp;
    timestamp = now;
    delta = offset - frame;
    frame = offset;

    v = 1000 * delta / (1 + elapsed);
    velocity = 0.8 * v + 0.2 * velocity;
}
The track() function plays its role during the manual dragging (the shaded part in the previous diagram). Once the user releases his finger from the touch device, the situations changes dramatically. Now we have to use the computed launch velocity to decide the next move, as evidenced from the implementation of the following function.
function release(e) {
    pressed = false;

    clearInterval(ticker);
    if (velocity > 10 || velocity < -10) {
        amplitude = 0.8 * velocity;
        target = Math.round(offset + amplitude);
        timestamp = Date.now();
        requestAnimationFrame(autoScroll);
    }

    e.preventDefault();
    e.stopPropagation();
    return false;
}
Compared to the original code (in Part 1), there is additional block to trigger the automatic scrolling, autoScroll function. The threshold speed of 10 pixels/second is used to prevent any automatic scrolling if the velocity is too low. The launch velocity is used to compute where the scrolling needs to stop, this is the purpose of the amplitude variable. The factor 0.8 is tweakable. If you want to make the list feel “heavy” reduce the number. Consequently, a higher factor will give the illusion of a smooth and frictionless list. Updating the scroll offset is the responsibility of autoScroll() function. Note how this is trigger using requestAnimationFrame for a jankfree animation.
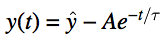
A typical flick list has a deceleration that is a form of exponential decay. In other words, the deceleration system is just an overdamped spring-mass system. Fortunately, it is a standard differential equation and its solution is rather straightforward (ŷ is the target position, A is the amplitude, t is the current time, τ is the time constant).
The math may look scary but the actual code is not that complicated. As long as this autoScroll() function still needs to move the list by more than 0.5 pixel, it will be repeatedly invoked. In fact, the following lines of code (it is indeed quite short, isn’t it?) is the heart of this well-known deceleration effect.
function autoScroll() {
    var elapsed, delta;
    if (amplitude) {
        elapsed = Date.now() - timestamp;
        delta = -amplitude * Math.exp(-elapsed / timeConstant);
        if (delta > 0.5 || delta < -0.5) {
            scroll(target + delta);
            requestAnimationFrame(autoScroll);
        } else {
            scroll(target);
        }
    }
}
The value of timeConstant here is quite important. If you want to really mimic iOS (in its UIWebView, decelerationRate normal), the suggested value is 325. This corresponds to a time constant of 325 ms. Math geeks may also realize that with the animation interval of 16.7 ms (from 60 fps), this automatic scrolling effectively reduces the scrolling velocity by a factor of 0.95, which is Math.exp(-16.7 / 325), until it barely moves and therefore the scrolling is stopped completely.
Just to emphasize again, the chart of position as a function of time for this deceleration is depicted below, created using Google plot 150*(1-exp(-t/325)). You may have seen the tail (last part) of the first diagram showing this kind of exponential decay curve.
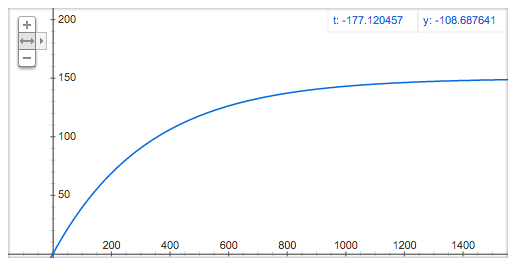
Note that this kind of automatic scrolling also means that the scrolling will stop, regardless of the initial velocity computed earlier, after approximately 1.95 seconds (6 * 325). System theory tells us that after the duration of 6x the time constant, the position will be within 0.25% of the target position (mathematically, you can get that from calculating Math.exp(-6)). Thus, by choosing the time constant, you can make the list feel light or heavy, depending on your need.
How about the rest of the code? It is, surprisingly, still the same as the one presented in first part. There is no need to modify drag() function because the behavior is still the same. Also the helper functions need not change at all. Recycling always feels good!
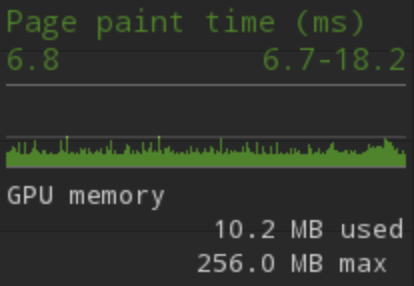
To see the full JavaScript code (roughly 130 lines), check the repository github.com/ariya/kinetic/. It has been tested on Android 4.3 or later (Chrome, Firefox), Android 2.3 (Kindle Fire), and iOS 6 or later (Mobile Safari). Also, as I mentioned in the beginning of this series, treat this example code as an example, nothing more and nothing less (it is optimized for readability and less on performance). Use the basic knowledge to inspire you to write, implement, and tweak your own variant of kinetic scrolling. That said, it doesn’t mean that this particular code is really slow. With Nexus 4 and Nexus 7, there is no problem of hitting 60 fps most of the time. This can also be verified by looking at the detailed frame statistics (using Chrome Developer Tools). Obviously, the painting time HUD is also very useful in this analysis.
The physics effect has fascinated many developers since iPhone popularized the concept. In fact, the web-oriented implementation of this concept exists in various forms (virtually in all mobile-focused libraries), from the early PastryKit edition to a dedicated microlibrary such as FTScroller. If you are always curious about the math and the physics behind it, I hope my explanation above shows that there is nothing really mystical about it.
In the third part, an important feature will be shown: snap to grid.
Update: It is published, please enjoy Part 3.