The fourth part of this JavaScript kinetic scrolling series shows an implementation of horizontal swipe to browse a gallery of photo. In addition to that, a simple parallax effect will be demonstrated as well.
Scrolling sideways is a common pattern in many application. The ubiquitous example is the home screen of many mobile tablets and phones, where the user needs to swipe left and right to scroll through the choices of many application icons. A typical photo application, even since the very first iPhone, allows the user to view the next and previous picture by a quick swipe. Tabbed view in many Android applications also feature the possibility of flicking to switch tabs (instead of tapping on the tab directly).
A clever tweak to a horizontal swipe interface is the extra parallax effect. It is easier to explain this if you see the Android home screen. As you swipe left/right, you can watch how the icons are moving at a different distance compared to the wallpaper. This gives the impression that the icons are floating in the air, as supposed to stick right on top of the wallpaper.
Another popular application leveraging the parallax effect is the native weather application (iOS and Android) from Yahoo!, as illustrated in the following diagram. In the right screenshot, I am dragging the screen to the right halfway. However, you can see that the black-and-white building does not disappear from the screen. If you look carefully at the left screenshot, that building is in the right-half of the screen. Without any parallax effect, if I push the background halfway, the right-half (and thus also the building) should not be visible anymore.

What does it take to implement this horizontal scrolling using vanilla JavaScript? Apparently, we already have the foundation in place. Dragging to the left/right is not foreign, this basic handling is in the Part 1 of this series. The flick gesture is already covered in Part 2. The fact that the screen needs to snap to the left or the right is simply the snap-to-grid feature, already explained in details in Part 3. What we need to change is the direction of the gesture detection as now we have to move horizontally.
To get the feeling of the implementation, open your browser and navigate to ariya.github.io/kinetic/4. Swipe left and right to scroll through the (wonderful) photos.
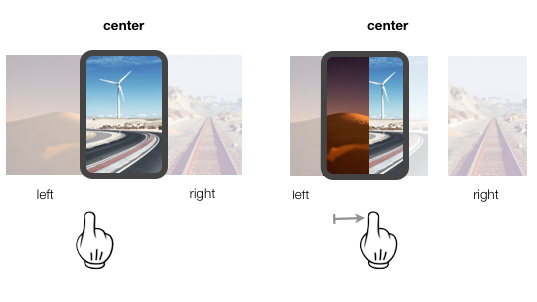
The core of the implementation is the three-card system, each represents the left, center, and right photo. Under normal circumstances, the center card occupies the entire view and both the left and right are out of the view. If the user swipes to the right, then we pulls the left card to the view (the center card is behind the left one). In addition to that, we also moves the center card at half the distance for the parallax effect.

The same scenario happens (in the reverse direction) if the user swipes to the left instead. Once the flick gesture is fully completed, we tweak all the three cards so that they all represents the final arrangement. All this logic takes only about 180 lines of JavaScript code (see scroll.js for details).
As an exercise for the reader, try to adjust the parallax implementation so that it faithfully resembles what Yahoo! Weather application does. With that application, you will notice that the new image (from the left or right) which got pulled as you swipe the center image has a peculiar parallax-ness as well. To implement something like this, you can’t use the img element directly as you need to wrap the image in another container, e.g. a div element, and adjust the offset of the image relative to its container. That seems challenging, but it is not too complicated to implement.
I hope this parallax effect is fascinating. See you in Part 5!