Shrinking PNG Images with Quantization
A screenshot is usually displayed from a PNG image. If the screenshot is mainly for the web consumption, often it is not important to have every pixel portraying the color faithfully. This is an opportunity to reduce the bandwidth consumption by delivering a reasonably good, quantized version of the screenshot in a smaller PNG image.
A perfect reproduction of a screenshot is often necessary for cases such as computer graphics research, Photoshop tutorials, etc. However, when a screenshot exists as an illustration to an article or a blog post, the pixel-by-pixel correctness can be sacrificed. Color quantization is suitable for this purpose. The trade-off: a minor loss in quality for a much smaller PNG file.
The following diagram compares an image in its original form and after being quantized to only 64 colors. See if you can spot enough perceptible differences.
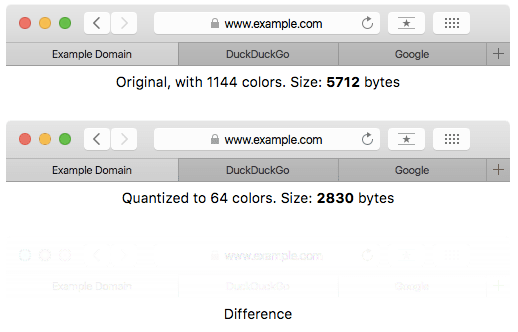
Meanwhile, the reduction in the file size looks promising. If this image is served on a popular web site, the total bandwidth saving could be significant. On top of that, your site visitors will enjoy the image appearing earlier on their web browser.
A popular tool for PNG color quantization is pngquant. Installing it easy as the web site, pngquant.org, already offers ready-to-use binary for various operating systems. On macOS (formerly known as OS X), if you prefer to work with a graphical application instead of a command-line tool, try ImageAlpha or ImageOptim instead.
$ pngquant
pngquant, 2.7.2 (June 2016), by Kornel Lesinski, Greg Roelofs.
   Color profiles are supported via Cocoa. Using libpng 1.6.23.
Here is an example of running pngquant on a file:
$ pngquant --speed 1 --verbose screenshot.png
screenshot.png:
  read 6KB file
  made histogram...1144 colors found
  selecting colors...2%
  selecting colors...4%
  selecting colors...6%
  selecting colors...8%
  selecting colors...21%
  selecting colors...34%
  selecting colors...46%
  selecting colors...59%
  selecting colors...72%
  selecting colors...85%
  selecting colors...97%
  selecting colors...100%
  moving colormap towards local minimum
  eliminated opaque tRNS-chunk entries...0 entries transparent
  mapped image to new colors...MSE=0.297 (Q=99)
  writing 256-color image as screenshot-fs8.png
No errors detected while quantizing 1 image.
The option -s1 means the slowest speed, for the best result (do not worry, even with this option pngquant usually finishes in a fraction of a second). The output will be a new file named screenshot-fs8.png. As you can see from the log (thanks to --verbose), the original image has 1144 distinct colors but now it has been reduced to only 256 colors. This also demonstrates that pngquant is a lossy compression, it is inevitable that some color information will be the lost. The trick is to understand whether the loss is still acceptable or not.
Now compare the original and the quantized versions to see if you are satisfied with the result. If it turns out that the quantized version still looks really good, it does not hurt to reduce the colors even further. For instance, running the following variant will limit the total number of colors to 64:
$ pngquant 64 --speed 1 screenshot.png
Also, I highly recommend running zopflipng on the output. Zopfli is a lossless encoder so expect no further quality degradation by using it, yet the file size may continue to decrease. For further details, refer to my previous blog post on using Zopfli to optimize PNG.
In the comparison illustrated earlier, a simple step of running pngquant (followed by zopflipng) cuts the file size to half of the original. Of course, the saving becomes more significant if the image is larger. If your web site serves a lot of PNG images, consider adding this step in your transport optimization strategy and your site visitors will appreciate you!