For React Native mobile apps targeting Android and iOS, an easy way to setup its continuous integration is to take advantage of Actions, an automation workflow service provided by GitHub. Even better, for open-source projects, GitHub Action offers unlimited free running minutes (at the time of this writing).
The advantage of React Native is a single code-base targeting two major mobile platforms, iOS and Android. However, care must be taken so that when one developer focuses on implementing features on fixing defects on Android, whatever they check in into the code will not break iOS and vice versa. Ideally, that developer should always check and verify for both platforms. But mistakes happen and the best way to catch them is to ensure that the corresponding continuous integration (CI) is running smoothly to catch those potential problems early on.
Thanks to GitHub Actions supporting running the workflow on macOS and Linux (also actually Windows, but that is not too relevant for this purpose), creating a CI for React Native is easy enough. To follow along, check the sample project (in the style of Hello world) that I have created at github.com/ariya/hello-react-native.
Let us start with the Android build since it is the easiest. Create a file with the name android.yml under the directory .github/workflows. The content should be like this:
name: Android

on: [push, pull_request]

jobs:
  build:
    runs-on: ubuntu-20.04
    steps:
    - uses: actions/checkout@v2
    - name: Use Node.js v12
      uses: actions/setup-node@v1
      with:
        node-version: 12.x

    - run: npm ci

    - run: ./gradlew assembleDebug -Dorg.gradle.logging.level=info
      working-directory: android
      name: Build Android apk (debug)
The above YAML declares that this workflow must be executed for every pull request and also once it is merged, as well as when a commit is pushed into the source repo. The workflow runs on a Ubuntu 20.04 machine which is, thanks to GitHub, already equipped with some development packages, including Java, Android SDK, and many other bits and pieces necessary for Android development. The first step is to check out the code (obvious) followed by another step to pick the Node.js version (12 in this case, feel free to adjust it to your project). The step npm ci will install all the dependencies. The next step after that is invoking Gradle to build the app, just as it is being done for a local development machine.
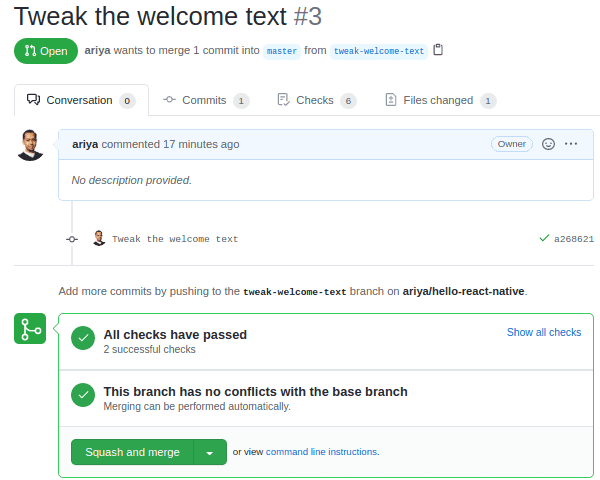
Once this file is ready, commit it to the repo, push the branch, and voila! GitHub will start to execute that build process for any future branch push and also for all pull requests (for this simple demo project, the build process takes about 3 minutes or less, not bad at all!). If the pull request does not break the Android build, we will see the usual green checkmark, as illustrated below. Of course, if the build breaks, the failure will be displayed and we can track the build log to find out what has gone wrong (this helps to accelerate the troubleshooting).
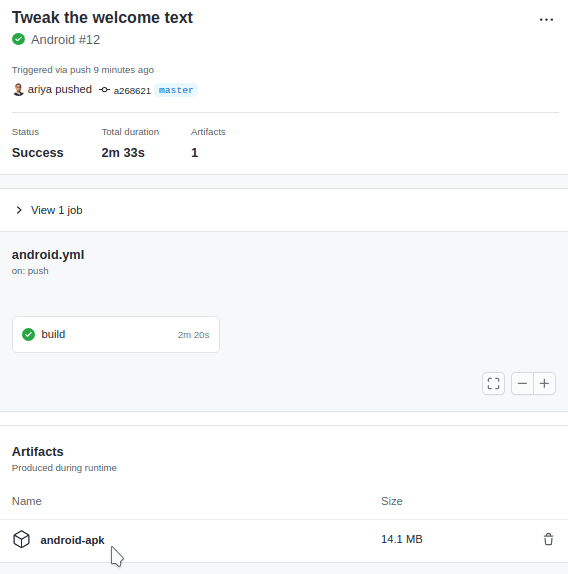
For completeness, we can also have the build artifact, the APK file generated by Gradle, archived for every workflow run. To do that, add the following lines:
    - uses: actions/upload-artifact@v2
      with:
        name: android-apk
        path: '**/*.apk'
Clicking on the green mark icon on the commit view will lead to the detailed result of Action workflows for that particular commit. We can also find the link to the archived artifact, in this case the APK files. Since the artifacts are retained for some time (based on the project settings, default to 30 days), this can be very handy when we want to troubleshoot a problem. Let us say a certain feature does not work anymore with today’s build but we are confident that the same feature still worked with the build from last week. Rather than checkout out different revisions and rebuild the app, we can just grab the APK files. Since these are built in debug mode, we can comfortably launch it in an emulator and debug it just like an APK that we build on a local development environment.
How about building for iOS? It is not exactly the same but it follow the same principles. Here is a minimalistic workflow file, ios.yml, as a starting point:
name: iOS
on: [push, pull_request]
jobs:
  build:
    runs-on: macos-latest
    steps:
    - uses: actions/checkout@v2
    - name: Use Node.js
      uses: actions/setup-node@v1
      with:
        node-version: 14.x
    - run: npm ci
    - run: xcode-select -p
    - run: pod install
      working-directory: ios
      name: Install pod dependencies
    - name: Build iOS (debug)
      run: "xcodebuild \
        -workspace ios/HelloReactNative.xcworkspace \
        -scheme HelloReactNative \
        clean archive \
        -sdk iphoneos \
        -configuration Debug \
        -UseModernBuildSystem=NO \
        -archivePath $PWD/HelloReactNative \
        CODE_SIGNING_ALLOWED=NO"
The first few lines are just like the Android workflow. The major difference here is that the workflow needs to run on a macOS machine, as iOS SDK isn’t available on neither Linux nor Windows. The build steps follow a similar pattern: check out the code, setup Node.js, and install dependencies. There are two extra steps. The first one is to run xcode-select -p to ensure the readiness of the correct Xcode and its related tool. The second one, pod install, is used to install any dependencies for CocoaPods, assuming that the project is using CocoaPods to manage iOS-specific dependencies (usually it is). After that, we invoke the command-line debug build with Xcode, just like what we would do on a local machine. Since building for iOS is a bit more complicated, for this simple demo project, it will run for around 10 minutes, give or take.
Note that the above YAML files cover the build for iOS and Android. Please do not forget to create another workflow file that runs the tests, typically with Jest, to catch potential regression on the unit tests and/or integration tests. Often times, this workflow is also the best place to run various static and dynamic code analyzers (linters, code formatter, security scanners, etc).
Armed with three workflow YAML files, we fully established a simple and yet powerful continuous integration for React Native apps. Happy developing!