MozJPEG, a JPEG encoder project from Mozilla, is a fantastic way to optimize your JPEG files. Setting it up however might be quite a hassle. Fortunately, a virtualized environment such as Docker offers a much simplified way to use MozJPEG.
The important requirement is that you have Docker installed and ready to use. If you are on Linux, this should be easy. For OS X and Windows users, follow the steps in my previous blog post on Easy Docker on OS X.
First, we will grab MozJPEG source code:
git clone git://github.com/mozilla/mozjpeg.git
cd mozjpeg
git checkout v3.1
In the current directory, create a Dockerfile with the following content. As you can see, here we will base it on Alpine Linux since it is quite small (around 5 MB).
FROM alpine:3.3
ADD . /source
RUN apk --update add autoconf automake build-base libtool nasm
RUN cd /source && autoreconf -fiv && ./configure --prefix=/opt/mozjpeg && make install
Once this Dockerfile is ready, fire it up with:
docker build -t mozjpeg .

You can watch the progress as Docker grabs Alpine 3.3 base image and let Alpine’s package manager, apk, install a number of dependent packages. After that, MozJPEG is being compiled and built from source. Once this is completed (it may take a while), we are ready to utilize this new image for optimizing JPEGs. Also, there is no need to stay in the current directory.
For the basics on using MozJPEG, I recommend reading the article Using mozjpeg to Create Efficient JPEGs. Let’s say we have a picture we want to optimize, e.g. photo.jpg. We can start a new Docker container containing the above compiled MozJPEG and use it as follows:
cd ~/Documents
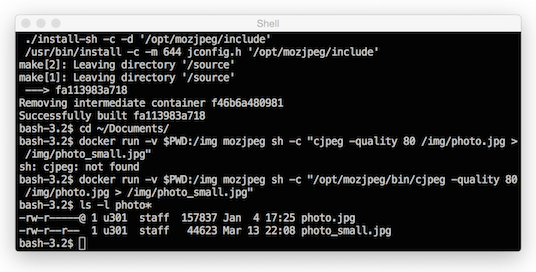
docker run -v $PWD:/img mozjpeg sh -c "/opt/mozjpeg/bin/cjpeg -quality 80
  /img/photo.jpg > /img/photo_small.jpg"
The command-line option –v $PWD:/img maps the current directory on your host machine to /img as seen from within the container. After that, a shell is invoked with the full command to start MozJPEG’s cjpeg at quality level 80. When I tried this on a simple photo, I was very happy with the optimized version while I got a massive decrease in file size (from 158 KB to 45 KB). Of course, your mileage may vary and make sure you read Kornel’s excellent article on fair image comparison.
Still not optimizing your JPEG files? Now you have no more excuse!