OpenVPN Server on Affordable Linux Machine
Previously, I have shown that running VPN all the time on modern smartphones should not cause any battery concern. In this follow-up, rather than using a commercial VPN service, we look at the simple steps to set up an OpenVPN ourselves.
OpenVPN, both on the server and the client, already became the de-facto standard in securing the data transport from the server, thereby effectively eliminating the chance of any man-in-the-middle attack. Note that this form of attack does not always seem to be malicious at first, it could be everything from ads injection using JavaScript or intentional quality degradation when streaming videos. In all cases, for road warriors and digital nomads, who occassionally have no choice but to connect to a public WiFi, the use of VPN reduces the attack surface.
Thanks to the proliferation of Linux servers which you manage yourself (hence, sometimes known as VPS, virtual private server) but they only cost $5/month or even less, setting up your own OpenVPN server also becomes more affordable. Note that it is still not as hassle-free as using a commercial VPN service. For instance, some sort of regular maintenance is still needed, even it is not too frequent. Also, these servers often have bandwidth quota (very generous, but still, quite not unlimited). On the plus side, for the paranoid among us, nothing beats a DIY setup.
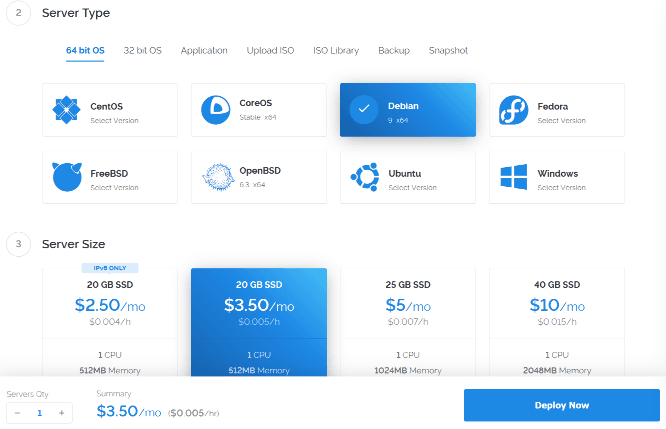
For this article, we are installing OpenVPN on Vultr. There is nothing special about Vultr, the principle should work well on Linode, Digital Ocean, etc. The first step is to sign up for an account at Vultr. After that, from the main page, choose Deploy New Server. Pick your favorite location and your favorite Linux flavor (I usually prefer Debian 9 64-bit). For the server type, 1 CPU with 512 MB is usually sufficient for this purpose. As a bonus, that server is rather cheap, $3.5/month. Do not forget to configure an SSH key for additional security. Click the Deploy button and prepare a cup of tea while waiting for the server instance to be installed by Vultr.
Once it is up and running, login remotely to that fresh server. Rather than doing a completely manual OpenVPN server setup, we are going to cheat and just use this project, angristan/openvpn-install. From within the server, run the commands:
$ apt install -y git
$ git clone https://github.com/angristan/openvpn-install.git
$ cd openvpn-install
$ bash ./openvpn-install.sh
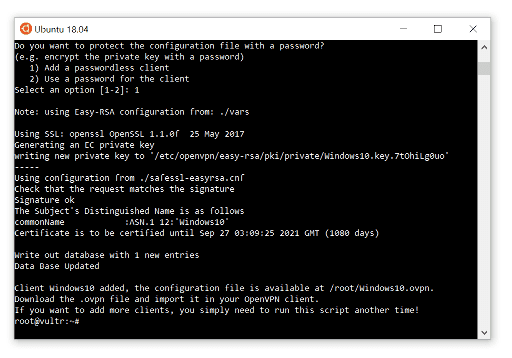
The script will guide you through the process. Among the information you need to supply (in a series of step-by-step question): port to listen to, UDP vs TCP, DNS resolver, compression, encryption settings, etc. Most likely, you should be fine with the default choices. Once this is completed, the script installs a couple of packages. After that you need to give the name of the client, this is to be used to produce an .ovpn file, the configuration for your OpenVPN client.
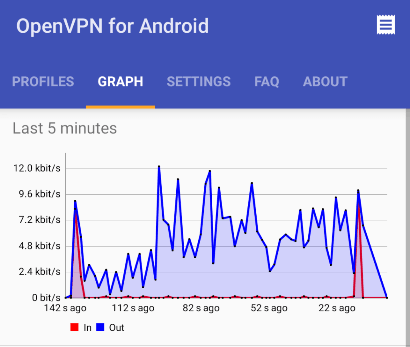 Once this `.ovpn` file is there, download it to your desktop or mobile devices. If you do not have it yet, it is time to install an OpenVPN client. On Mac, [Tunnelblick](https://tunnelblick.net/) works like a charm. Meanwhile, there are also numerous OpenVPN apps for both Android and iOS. Each of these client app will have a way to load the connection configuration from the `.ovpn` file you just downloaded. For more details, refer to the documentation or a good tutorial (such as [this one](https://www.linode.com/docs/networking/vpn/configuring-openvpn-client-devices)).
After the configuration is loaded, try it and wait for a minute or two while OpenVPN client is making the connection. Once this step is completed successfully, check your IP address and DNS addresses (e.g. using IPLeak) and now they should be representing the location of your chosen Vultr server. Congratulations, now you have less concern when using untrusted public WiFi!