Deploying React Native Applications using App Center
React Native emerged as a popular framework to build Android and iOS applications from a single code base. Verification of React Native apps during the development phase is not always easy, but thanks to a host of managed services, the CI/CD process can be simplified a lot.
A particularly interesting solution is App Center, part of the Visual Studio product suite from Microsoft. With its built-in support for React Native, it can not be more easier to automatically build, test, package, and distribute React Native apps, for both iOS and Android. As of this writing, App Center is using the pay-as-go pricing model. If you are a hobbyist or developing an app for fun, likely you will be still within the free tier.
To illustrate the use of App Center, I created a very simple React Native app (at the level of Hello World). It is available from its repository: github.com/ariya/hello-react-native. Our objective is to have this app built and deployed through App Center, for both the Android and iOS flavors.
The journey is rather straightforward. First, go to appcenter.ms and sign in there (conveniently, login using GitHub is possible). Next, create a new app. Due to the nature of how App Center works, if you need both Android and iOS from the same code base, you still need to create two separate apps. For the OS field, pick the right one (remember to do one for Android and another for iOS) and for the the Platform field, choose React Native. Once it is created, point to the repository so that App Center can access the source code. As of now, App Center supports Azure DevOps, GitHub, and Bitbucket. After a while, App Center will display the list of available branches from that repository, this is where the build can be configured. Hover on a branch (e.g. master) and a gear icon will appear. Click on the gear icon to start tweaking its build configuration.
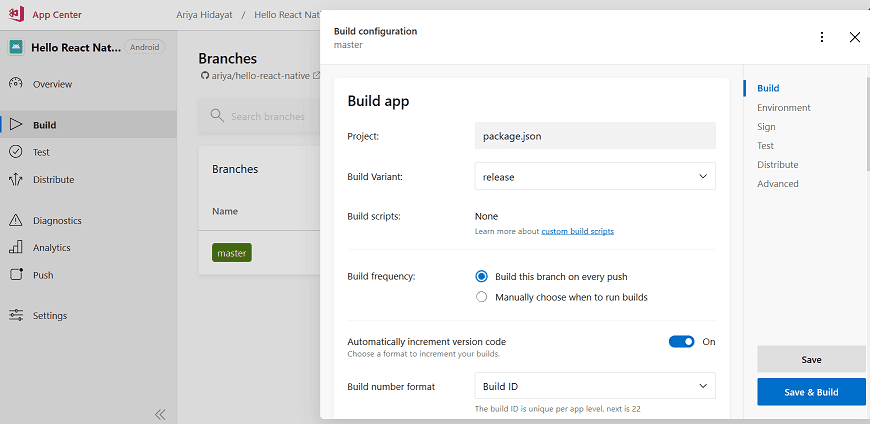
The build configuration should be self explanatory. An important note is to check the box Automatically increment version code as this eliminates a variety of possible headaches (can not install the app cause the previous version is already there, and something along that line). Since likely the built app must be tested and deployed to real devices, make sure to configure the section called Sign builds. For Android, upload the keystore and do not forget to supply the password, key alias, etc. For iOS, upload the provisioning profile and the corresponding certificate. Once that is done, click the Save & Build button and if nothing goes wrong, App Center will happily consume your source code and build the app. For a simple app such as the hello-react-native demo mentioned earlier, the build is quite fast. Android build takes 3 minutes, while iOS build roughly needs 6 minutes.
Building the app is however just the first step. The most important task is to deploy the app. Let us assume for a moment that you want to get the app to the hands of your brave QA team. From the same App Center console, go to Distribute, Groups and then create a new group, e.g. Tester. In this group, add the e-mail addresseses of everyone who is supposed to help testing the app (each of them will receive an e-mail invitation along with a detailed instruction). The next step is to click on the New Release button. It will start a 5-step process. From the first step, click on Choose build from branch. This allows you to pick a branch (e.g. master) and the most recent builds from that branch. Select the build you would like to distribute and follow the rest of the guided process. It is so easy!
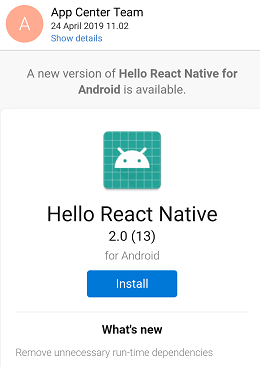
Everyone who is supposed to get enrolled to the group will get an email notification when a new build is released to them. Installing that build is as simple as clicking the Install button in that e-mail. Also, in case they want to go back and try some older builds of the app, they can sign in to their App Center account and view the complete archive of the builds and choose the one they like to install. This is very convenient as there is no need to hunt for that e-mail attachment, message on Slack, or other free-form notification of those builds.
Now, as every developer familiar with iOS development can testify, getting a new member of the tester team to have their device provisioned is not always easy. Fortunately, App Center simplifies the process for us. For every iOS tester, their iPhone/iPad can be provisioned at a click of a button. Simply go to Distribute, Groups, choose the group, and then go to the Devices tab. There is this Register devices button waiting to be clicked.
Even better, you can have App Center automatically provision the device! Clik on the gear icon to open up the Group settings and check the Automatically manage devices. Note that you still need to input the credential for the Apple ID of the Apple Developer account, but after that, there is no need to manually provision every new device. It is very handy because when you expand the tester group to include new members, they can have their iPhones or iPads provisioned right away and off they go to run the app.
While App Center is fantastic (among others) to ease the deployment of any React Native apps, I find that a complementary continuous integration (CI) is still nice to have. For instance, it is wonderful to be able to keep the complete debug builds of every commit, just in case there is a need for troubleshooting. For hobbyists who want to stay within the free tier of App Center, it is also better to delegate most of the extensive code analysis (linting, thorough tests with code coverage, etc) to a CI system while utilizing App Center more for the release process. Fortunately, there is another good service, Azure Pipelines, which works very well as a managed CI for Android and iOS and that it works equally well for React Native development. Feel free to refer to my previous blog posts, Building iOS Apps on Azure Pipelines and Building Android Apps on Azure Pipelines, for more details.
Note that App Center is capable of doing more than just application deployment. Its official documentation is very well written, do not miss a chance to explore it.
Keep on building great apps with React Native!